- Enable POP in your email account. Don't forget to click Save Changes when you're done.
- Open Outlook.
- Click the Tools menu, and select E-mail Accounts...
- Click Add a new e-mail account, and click Next.
- Choose POP3 as your server type by clicking the radio button, and click Next.
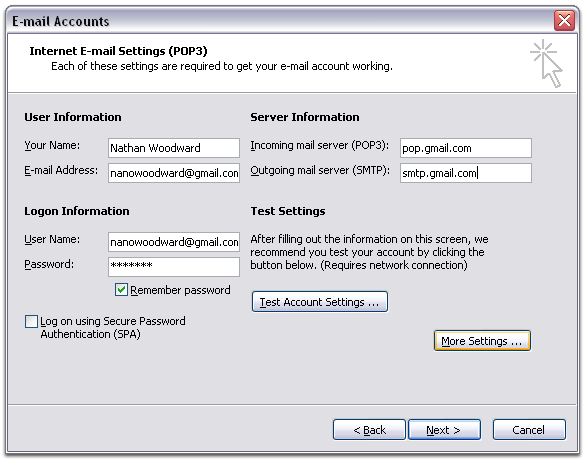
- Fill in all necessary fields to include the following information:
User Information
Your Name: Enter your name as you would like it to appear in the From: field of outgoing messages.
Email Address: Enter your full email address (username@gmail.com or username@your_domain.com) Server Information
Google Apps users, enter the server names provided, don't add your domain name in this step.
Incoming mail server (POP3): pop.gmail.com
Outgoing mail server (SMTP): smtp.gmail.com
Login Information
User Name: Enter your Gmail username (including @gmail.com). Google Apps users, enter your full address in the format username@your_domain.com
Password: Enter your email password

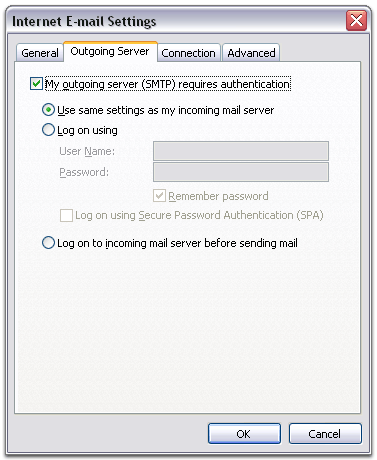
- Click More Settings... and then click the Outgoing Server tab.
- Check the box next to My outgoing server (SMTP) requires authentication and select Use same settings as my incoming mail server.

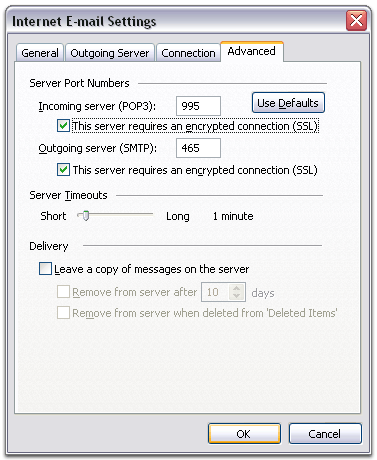
- Click the Advanced tab, and check the box next to This server requires an encrypted connection (SSL) under Incoming Server (POP3).

- Check the box next to This server requires an encrypted connection (SSL) under Outgoing Server (SMTP), and enter 465 in the Outgoing server (SMTP) box.
- Click OK.
- Click Test Account Settings... After receiving Congratulations! All tests completed successfully, click Close.
- Click Next, and then click Finish.
- Download the latest updates for Outlook from Microsoft. This will help prevent the most common Outlook errors Gmail users see.
.
mob
Sunday, March 7, 2010
Categories: tips and tricks
To set up your Outlook client to work with Gmail:
Related Posts
tips and tricks
Subscribe to:
Post Comments (Atom)


No Response to "gmail settings for outlook 2003"
Post a Comment